
Everything You’ll Need
| Tool / Material | Engineered Hardwood (Glue-Down) | Engineered Hardwood (Floating/Click-Lock) | Purpose |
|---|---|---|---|
| Tape Measure | ✔ | ✔ | Measure layout and planks |
| Chalk Line | ✔ | ✔ | Mark layout lines |
| Pry Bar | ✔ | ✔ | Remove old flooring/baseboards |
| Moisture Meter | ✔ | ✔ | Check subfloor moisture |
| Level | ✔ | ✔ | Ensure even subfloor |
| Spacers | ✔ | ✔ | Maintain expansion gap at walls |
| Flooring Adhesive | ✔ | ✘ | Glue engineered wood to subfloor |
| Trowel (for adhesive) | ✔ | ✘ | Spread adhesive evenly |
| Click-Lock Installation Kit | ✘ | ✔ | Includes tapping block, pull bar, spacers |
| Miter Saw | ✔ | ✔ | Make crosscuts on planks |
| Jigsaw / Oscillating Tool | ✔ | ✔ | Trim around obstacles |
| Safety Glasses | ✔ | ✔ | Eye protection while cutting |
| Knee Pads | ✔ | ✔ | Comfort during install |
| Underlayment / Vapor Barrier | ✔ (moisture barrier) | ✔ | Reduces noise & moisture issues |
| Shop Vac or Broom | ✔ | ✔ | Keep area clean while working |
Step 1: Prepare the Space
Take Out Baseboards and Old Flooring
Start by getting rid of the current flooring and baseboards to reveal the subfloor. This creates a smooth surface and helps with proper edge expansion.
Use a pry bar to gently remove baseboards without damaging the drywall so they can be put back later. Take out any carpet, vinyl, or laminate, and make sure all glue or staples are thoroughly scraped off.
Clean and Level the Subfloor
Sweep and vacuum the entire subfloor to clear away dust, nails, debris, or glue residue. Check for dips or high spots using a straight edge or long level.
- If there are high spots, sand them down.
- If there are low spots, use a floor leveling compound to fill and smooth them out.
A flat, even subfloor is important to prevent squeaks and ensure long-lasting durability.
Check for Moisture or Damage
Moisture can cause floor problems. Use a moisture meter to test both the subfloor and your flooring materials.
- For wood subfloors: moisture should usually be below 12%.
- For concrete subfloors: follow specific limits — usually below 4% with a calcium chloride test.
If moisture levels are too high, pause installation and fix the issue before moving on.
Install Underlayment or Vapor Barrier (If Needed)
You might need an underlayment or moisture barrier depending on your flooring type and subfloor:
- Over concrete: use a vapor barrier or underlayment with moisture protection.
- Over plywood or OSB: a rosin paper, felt underlayment, or foam pad might be needed.
Follow the manufacturer’s instructions to avoid warranty issues and ensure best performance. Lay the underlayment flat, without overlapping, and tape seams where needed.
Step 2: Plan Your Hardwood Layout
Choose Your Starting Wall
For most rooms, run the planks parallel to the longest or most visible wall. This makes the room feel bigger. If doing multiple rooms, think about how planks will line up through doorways.
Use a chalk line to make a straight guideline on your starting wall. This keeps your first rows straight and helps with the rest of the layout.
Acclimate the Flooring
Before you start, let the planks get used to the room’s temperature and humidity for at least 48 to 72 hours. Place the boxes flat in the room and open the ends for air flow.
This helps prevent issues like expansion or warping after installation.
Dry-Lay a Few Rows
Lay out some boards without attaching them to see how the layout looks. This helps you:
- Ensure the room looks balanced
- Avoid narrow planks near walls
- Plan for things like vents or door frames
Mix boards from different boxes to spread color and grain evenly.
Stagger Seams and Avoid Patterns
For a natural look, stagger the plank ends by at least 6 to 8 inches in each row. Don’t repeat lengths or make patterns like “stair-step” or “H”.
Tip: Use different plank lengths to create a natural flow.
Calculate Material (Add Extra for Waste)
Measure the space (length × width) and add 10% for waste, mistakes, and repairs.
If your room has odd shapes or you’re installing diagonally, increase the waste to 12–15%.

Step 3: Choose Your Installation Method
Before starting to lay flooring, choose the best method for your flooring type and subfloor. Each method needs different tools and techniques.
Floating Installation (Click-Lock)
This is popular for DIY with click-lock planks. They connect and “float” over an underlayment without nails or glue.
- Best for: Click-lock planks over any flat surface
- Tools needed: Spacers, tapping block, underlayment
- Pros: Fast, clean, beginner-friendly
- DIY Difficulty: Easy
Pro Tip: For simple DIY, many prefer floating floors because they are easy to install without special tools.

Step 4: Mark Guidelines and Snap Chalk Lines
Before you start installing, make sure to have a straight line for guidance.
Draw a Chalk Line by Your Starting Wall
Find your starting wall, usually the longest or most noticeable one. Measure the width of a board (including the space for expansion) and draw a chalk line parallel to the wall. This line will guide your first row.
Keep Rows Straight with the Line
Align the boards with the chalk line as you install them. This helps keep the floor straight and prevents it from drifting or curving.
Leave a 1/2″ Space for Expansion
Wood expands and contracts with humidity. Use spacers to leave a 1/2-inch gap between the floor and the walls, door frames, and other fixed items. This space lets the floor expand without problems.

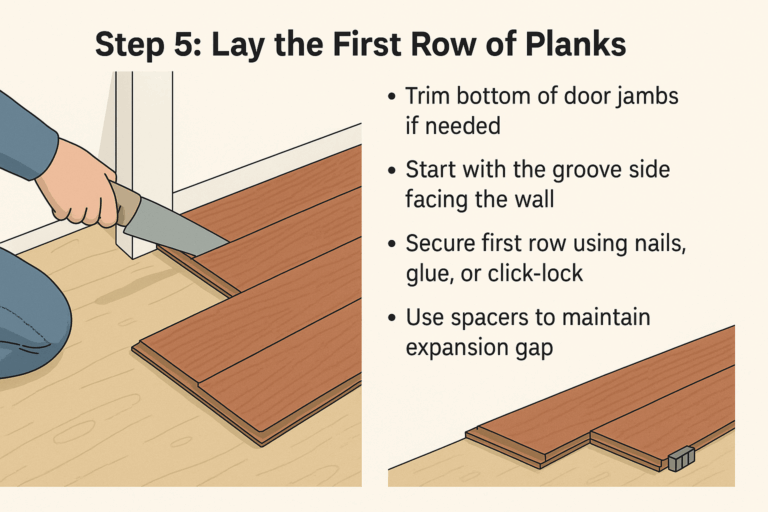
Step 5: Lay the First Row of Planks
Trim Door Jambs if Needed
Before you lay the first plank, check if it needs to go under any door frames or trim. Use a saw to trim the bottoms of door jambs so the planks fit nicely underneath without gaps.
Start with Groove Side Facing the Wall
Put the first plank with the groove side toward the wall. This helps the tongue of the next row click or lock in place easily. Start on the longest, straightest wall to ensure the flooring lines up well.
Secure the First Row
Depending on how you install:
- Nail-down: Use a flooring nailer to attach the boards into the subfloor through the tongue side.
- Glue-down: Spread glue with a trowel and press each plank firmly in place.
- Floating (click-lock): Angle the second plank into the first and click to lock.
Make sure the planks are tight together without gaps.
Use Spacers to Maintain Expansion Gaps
Put 1/2″ spacers between the planks and the wall. This gap helps with natural expansion and contraction due to humidity and temperature changes, preventing buckling or warping over time.
Step 6: Install the Remaining Flooring
Once the first row is set up and straight, keep placing your planks one row at a time.
Stagger End Joints for Strength
To make the floor strong and look nice, place the end joints of each row at least 6 inches apart. Don’t line them up across rows, as it makes the floor weaker.
Use a Tapping Block for a Snug Fit
Put a tapping block on the plank’s edge and tap it with a mallet to close gaps. This helps boards fit closely without harming the edges.
Secure Boards by Your Chosen Method
- Nail-down: Put nails through the tongue at a 45° angle every 6–8 inches.
- Glue-down: Spread glue evenly and press planks firmly.
- Floating floor: Click boards together end-to-end and side-to-side.
Check for Level Often
Use a level every few rows to keep the floor flat. Adjust if needed to avoid future problems.
Step 7: Cut Boards to Fit Edges and Corners
As you get close to walls or obstacles, cut the last planks to fit perfectly.
Measure and Mark Carefully
Use a tape measure to find the exact space left, taking off 1/2″ for an expansion gap. Mark the plank with a pencil or chalk.
Use the Right Saw for the Job
- Miter saw: Great for straight cuts.
- Jigsaw: Good for curved cuts around vents or door frames.
Always cut on a stable surface and wear safety glasses to keep your eyes safe from dust and debris.
Maintain Expansion Gaps
Keep a 1/2″ gap between the flooring and all vertical surfaces like walls and pipes. This lets the flooring expand and contract naturally.

Step 8: Reinstall Baseboards and Transition Strips
Reattach Baseboards and Shoe Molding
After your flooring is installed, make the room look neat by putting back the baseboards around the edges. If there was shoe molding before, add it again for a smooth finish.
Install Transition Strips
In doorways and where one floor type meets another (like tile or carpet), put in the right transition strips. Use T-moldings, reducers, or thresholds based on the height and type of the floor next to it.
Leave Room for Movement
When attaching trim, don’t fix it to the floor itself, as this can cause it to buckle. Secure all trim to the wall or subfloor instead.

Step 9: Clean and Inspect Your Floor
After installation, clean and check your new floor to make sure it’s perfect before use.
Sweep and Vacuum Well
Use a broom or a vacuum with a soft brush to get rid of all dust and debris. This helps you see the floor clearly and stops scratches during checks or when adding furniture.
Look for Problems
See if there are any gaps, uneven parts, or noises when walking on the floor. If some boards don’t line up right, use a tapping block to fix them or check your installation guide for help.
Allow the Floor to Settle
If you used glue, wait 24–48 hours before adding furniture or rugs. This gives time for the glue to fully dry and keeps the floor from moving.

Pro Tips for a Successful Hardwood Installation
Achieve great results with your flooring by preparing well and being precise. These tips will help you work efficiently and avoid problems:
- Always check for moisture with a meter before installing — this stops future issues like cupping or buckling.
- Wear knee pads to protect yourself when working long hours, and ensure good ventilation if using glue.
- Check alignment every few rows to keep planks straight and even.
- Work in small sections instead of rushing the whole room at once — this keeps quality high.
- Take your time with cuts. Precise cuts make a big difference for tight seams and professional results.
Common Mistakes to Avoid When Installing Flooring
Even skilled DIY enthusiasts might face problems if they don’t avoid these common errors:
- Skipping the acclimation period can make the material expand or shrink after installation.
- Ignoring subfloor moisture and flatness causes instability, noise, or gaps.
- Not staggering seams weakens the structure and creates an uneven look.
- Nailing too close to the edge of the plank can cause splits or cracks.
- Forgetting to use spacers leaves no room for expansion, leading to buckling.
DIY vs. Professional Hardwood Installation
Installing flooring yourself can save money, but it’s not for everyone. Here’s how to decide whether to DIY or hire professionals.
DIY Pros:
- Lower cost overall
- Control over timing and pace
- Satisfaction from doing it yourself
DIY Cons:
- Physically tough and takes time
- Needs careful planning and tools
- Mistakes can be expensive
Professional Installation Pros:
- Quick and expert results
- Includes preparation and cleanup
- Workmanship warranties often included
Professional Installation Cons:
- Higher labor costs
- Less control over schedule
📊 Side-by-Side Comparison Table
| Feature | DIY Installation | Professional Installation |
|---|---|---|
| Average Cost per Sq Ft | $3 – $8 (materials + tools) | $7 – $18 (includes labor) |
| Best For | Budget-conscious, handy people | Busy people, large or complex jobs |
| Time Commitment | Several days or weekends | 1–2 days (typical) |
| Risk of Mistakes | Moderate to high | Low |
| Tool Investment Required | ✔ | ❌ (provided by installer) |
| Satisfaction | High (if done well) | High (with professional finish) |
👉 For a full breakdown of costs, methods, and scenarios, visit our Flooring Cost Guide
Do You Need Professional Help With Your Hardwood Flooring Installation Project?
Now that you’ve learned how to install flooring step-by-step, you’re ready to create a beautiful look that adds value to your home. But if you’d like to skip the hard work, we’re here to help.
Our expert flooring installation team takes care of everything with precision. We’ll ensure your floor is level, secure, and long-lasting — without any hassle for you.
Contact us today to schedule your free in-home consultation and see if we serve your area!


